IRISH HEDGE SKINCARE WORKSHOP - JULY 14th
Fun Herbal Activities to Do with Kids: Simple Nature Crafts & Remedies
Fun Herbal Activities to Do with Kids. Whether you're homeschooling, looking for weekend activities, or simply want to reduce screen time, these herbal crafts and nature projects will spark curiosity, creativity, and a lifelong love of the natural world.
DIY
Simple Herbal Remedies
7 min read


Fun Herbal Activities to Do with Kids: Simple Nature Crafts & Remedies
This post may contain affiliate links.
Looking for creative ways to connect your children with nature while teaching them about herbs and plants? These simple herbal activities combine fun, learning, and hands-on exploration that kids absolutely love. From creating magical leaf art to making soothing remedies, these projects turn your backyard or local park into an exciting outdoor classroom.
Whether you're homeschooling, looking for weekend activities, or simply want to reduce screen time, these herbal crafts and nature projects will spark curiosity, creativity, and a lifelong love of the natural world.
Why Herbal Activities Are Perfect for Kids
Develops Observation Skills: Children learn to notice details in leaves, flowers, and plants—skills that transfer to all areas of learning.
Teaches Sustainability: Kids discover how nature provides materials for crafts, remedies, and daily life, fostering environmental awareness.
Encourages Outdoor Time: These activities get children outside, moving, and breathing fresh air instead of staring at screens.
Builds Confidence: Creating something beautiful or useful from natural materials gives kids a sense of accomplishment.
Family Bonding: Gathering materials and crafting together creates lasting memories and quality time.
Science Education: Herbal activities naturally teach botany, biology, chemistry, and ecology in engaging, memorable ways.
Safety First: Guidelines for Herbal Activities with Kids
Before starting any herbal activity, follow these important safety rules:
Never eat, taste, or apply unknown plants to skin without proper identification
Supervise young children during all activities, especially when using scissors or handling plants
Teach "look but don't touch" for unfamiliar plants—some can cause skin irritation
Wash hands thoroughly after handling plants and before eating
Check for allergies before applying any herbal preparations to skin
Avoid foraging near roads, treated lawns, or polluted areas
Use child-safe tools appropriate for your child's age
Now, let's explore ten wonderful herbal activities that are safe, educational, and absolutely delightful!
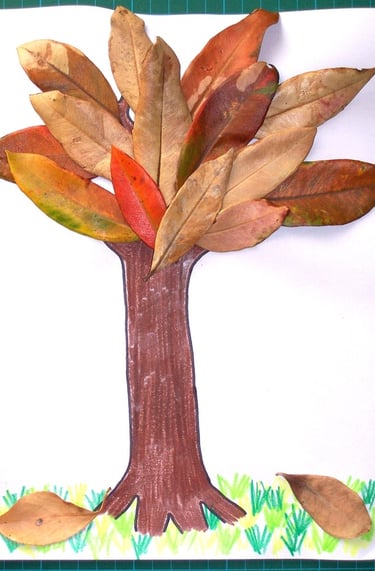

1. Autumn Leaf Tree Art
Age Range: 3-12 years
Season: Autumn/Fall
Time Required: 1-2 hours
Create a stunning tree sculpture using fallen autumn leaves in their gorgeous seasonal colours.
What You'll Need:
Fallen leaves in various autumn colours (red, orange, yellow, brown)
Large piece of cardboard or poster board
Glue stick or craft glue
Brown paint or markers
Optional: twigs, acorns, pinecones for decoration
How to Create Your Leaf Tree:
Step 1: Collect Leaves Take a nature walk and gather fallen leaves in various shapes, sizes, and colours. Talk to your children about why leaves change colour and why trees shed them in autumn.
Step 2: Press Leaves Flat Place leaves between heavy books for 1-2 days to flatten them, or use them fresh for a more dimensional effect.
Step 3: Draw the Tree Trunk On your cardboard, draw or paint a tree trunk and branches. Kids can use their arms and hands as templates—trace their forearm for the trunk and their fingers for branches!
Step 4: Create the Canopy Glue leaves around the branches to create a full, colorful tree canopy. Overlap leaves for a layered, realistic effect. Let children arrange colors however they like—there's no wrong way!
Step 5: Add Details Glue small twigs at the base for fallen branches, add acorns or pinecones as "fruit," or draw grass and flowers around the base.
Educational Extension: Discuss the life cycle of trees, why leaves fall, and how trees prepare for winter. Identify different tree species by their leaf shapes.
2. Herbal Tea Tasting Party
Age Range: 5+ years
Season: Year-round
Time Required: 30-60 minutes
Introduce children to the wonderful world of herbal teas through a fun tasting experience.
What You'll Need:
3-5 different child-safe herbal teas (chamomile, peppermint, rooibos, lemon balm, fruit teas)
Small teacups or mason jars
Honey or maple syrup for sweetening
Paper and crayons for recording impressions
Optional: fresh herbs to smell and touch
How to Host Your Tea Party:
Step 1: Set Up Tasting Stations Brew 3-5 different herbal teas and pour small amounts into cups. Label each tea or keep them mystery teas for older kids to guess.
Step 2: Discuss Each Herb Before tasting, let children smell and touch the dried or fresh herbs. Discuss where they grow and their traditional uses.
Step 3: Taste and Record Have children sip each tea and draw or write about what they taste, smell, and feel. Ask: "Does it taste sweet? Minty? Earthy? How does it make you feel?"
Step 4: Vote on Favourites Let everyone vote on their favourite tea. Discuss why different people like different flavours.
Educational Extension: Teach children how different cultures use tea, the difference between herbal tea (tisane) and true tea, and how plants are dried and preserved.
Safety Note: Only use child-safe herbs. Avoid herbs with strong medicinal properties. Always check for allergies first.
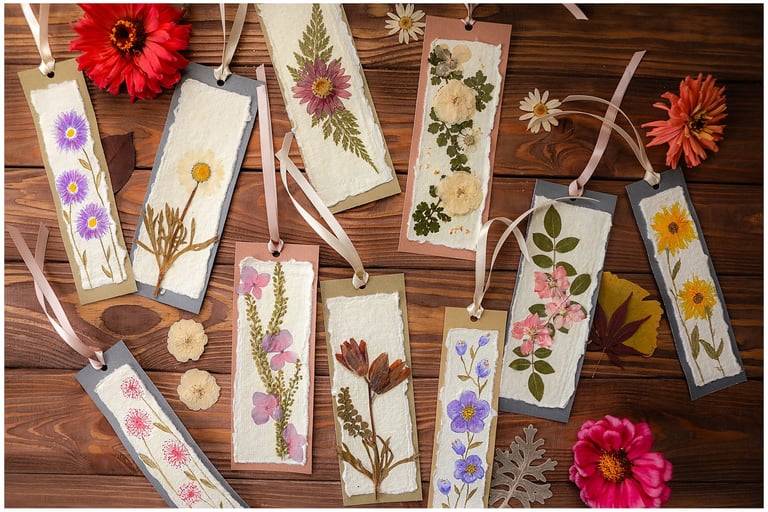
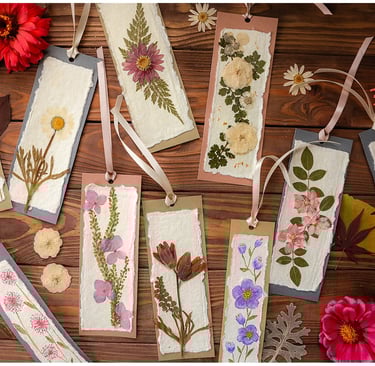
3. Pressed Flower Bookmarks
Age Range: 4-10 years
Season: Spring and Summer
Time Required: 10 minutes active, 1-2 weeks pressing time
Create beautiful, functional bookmarks using pressed flowers and herbs from your garden.
What You'll Need:
Fresh flowers and small herb leaves (violets, daisies, pansies, thyme, mint leaves)
Heavy books for pressing
Parchment or newspaper
Card stock or thick paper
Clear contact paper or laminating sheets
Scissors and ribbon
How to Make Pressed Flower Bookmarks:
Step 1: Collect Flowers Choose small, flat flowers and herb leaves. Avoid thick or fleshy flowers that don't press well.
Step 2: Press Flowers Place flowers between parchment paper, insert into a heavy book, and stack more books on top. Wait 1-2 weeks until completely dry.
Step 3: Design Bookmarks Cut card stock into bookmark-sized rectangles (about 2 inches × 6 inches). Arrange pressed flowers in pretty patterns.
Step 4: Seal and Protect Once satisfied with the design, cover the front and back with clear contact paper or laminating sheets. Trim excess.
Step 5: Add Finishing Touches Punch a hole at the top and thread ribbon through for a decorative touch.
Educational Extension: Create a "flower identification guide" with bookmarks showing different species. Label each bookmark with the flower's common and scientific name.
4. DIY Lavender Sleep Sachets
Age Range: 6+ years
Season: Year-round (summer for fresh lavender)
Time Required: 30-45 minutes
Teach children about lavender's calming properties while creating soothing sleep sachets.
What You'll Need:
Dried lavender buds (3-4 tablespoons per sachet)
Small fabric squares (cotton or muslin, 6×6 inches)
Ribbon or twine
Optional: dried chamomile, rose petals, or a few drops of lavender essential oil
How to Make Lavender Sachets:
Step 1: Prepare Materials If using fresh lavender, hang it upside down in a warm, dry place for 1-2 weeks until fully dried. Strip the buds from the stems.
Step 2: Create the Sachet Place fabric square flat. Add 3-4 tablespoons of dried lavender to the center. For extra relaxation, mix in dried chamomile.
Step 3: Bundle and Tie Gather the corners of the fabric together and tie tightly with ribbon, creating a little bundle.
Step 4: Decorate (Optional) Let children decorate the sachet with fabric markers or attach a handmade tag saying "Sweet Dreams" or "Sleep Well."
Step 5: Use and Enjoy Place the sachet under pillows or in drawers. The gentle lavender scent promotes relaxation and better sleep.
Educational Extension: Discuss how lavender has been used for centuries for relaxation. Explain the concept of aromatherapy and how scents affect our emotions and sleep.
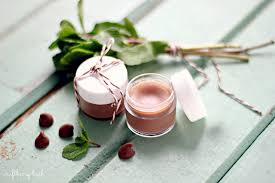

5. Mint Chocolate Lip Balm
Age Range: 8+ years (with supervision)
Season: Year-round
Time Required: 30 minutes plus cooling time
Teach children to make a simple herbal remedy they'll actually use!
What You'll Need:
2 tablespoons coconut oil
1 tablespoon beeswax pellets
1 teaspoon cocoa powder
2-3 drops peppermint essential oil
Small tins or lip balm tubes
Double boiler or microwave-safe container
How to Make Mint Chocolate Lip Balm:
Step 1: Melt Base Ingredients With adult supervision, melt coconut oil and beeswax together in a double boiler or microwave, stirring until completely liquid.
Step 2: Add Flavor and Color Stir in cocoa powder thoroughly until no lumps remain. The cocoa adds a subtle chocolate scent and natural tint.
Step 3: Add Peppermint Remove from heat and add peppermint essential oil. Stir well. Let children smell the mixture—it's like chocolate mint!
Step 4: Pour into Containers Carefully pour the liquid mixture into small tins or lip balm tubes. Children can help with pouring using a small funnel.
Step 5: Cool and Label Allow to cool and solidify completely (about 30 minutes). Let kids create labels with the ingredients and date.
Educational Extension: Discuss how peppermint soothes lips, cocoa butter moisturizes, and beeswax protects. Explain the difference between essential oils (concentrated plant extracts) and fragrance oils (synthetic).
Safety Note: Always supervise children around heat. Test for mint sensitivity before use.
8. Herb Sensory Bottles
Age Range: 2-8 years
Season: Spring and Summer
Time Required: 20-30 minutes
Create calming sensory bottles filled with herbs, flowers, and natural materials.
What You'll Need:
Clear plastic bottles with tight lids (water bottles work well)
Dried herbs and flowers (lavender, chamomile, rose petals, calendula)
Water or oil (baby oil or mineral oil)
Optional: glitter, small stones, food colouring
Strong glue to seal lid
How to Make Herb Sensory Bottles:
Step 1: Choose Materials Let children select dried herbs, flowers, and natural materials. Discuss the scent and properties of each.
Step 2: Fill Bottle Add dried materials to the bottle—about one-third full. For floating effects, use lighter flowers like chamomile.
Step 3: Add Liquid Fill the bottle with water (for faster movement) or oil (for slower, calmer movement). Leave a small air gap at the top.
Step 4: Secure Lid Adults should apply strong glue around the threads before screwing the lid on tightly to prevent spills.
Step 5: Shake and Observe Children can shake, roll, and watch the herbs swirl and settle. Perfect for calming anxious moments or quiet time.
Educational Extension: Create different bottles with different herbs and discuss how each makes you feel. Create a "calm down corner" with sensory bottles for emotional regulation.